6 posts tagged with "lora"

View All Tags

· One min read

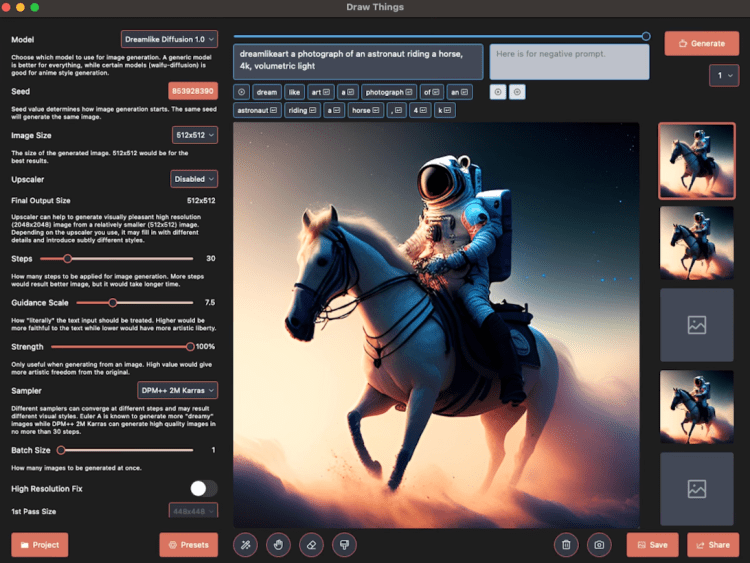
Stable Diffusion is an open-source AI image generator released in 2022 by the start-up Stability AI.

It is primarily used to generate detailed images conditioned on text descriptions, though it can also be applied to other tasks such as inpainting, outpainting, and generating image-to-image translations guided by a text prompt.

With Stable Diffusion, you can generate kinds of images in Anime style, Photo-realistic, Landscape, Fantasy, Artistic styles, etc.

Stable Diffusion is powerful and completely free to use. Here to learn more: Stable Diffusion Public Release.

img_center

Here are some relevant posts for you:

· 3 min read

AUTOMATIC1111 Stable Diffusion webui is the de facto GUI for advanced users.

This guide will teach you how to use it. You can use it as a tutorial. There are plenty of examples you can follow step-by-step.

If you don't know how to install Stable Diffusion, please check here: Windows and Mac.

Text-to-image

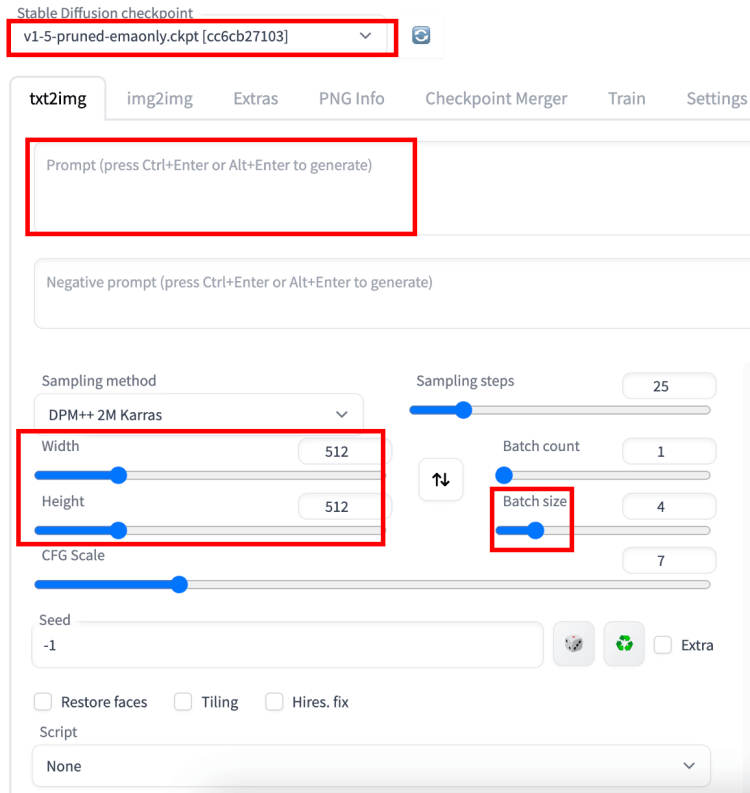
You will see the txt2img tab when you first start the GUI. This tab does the most basic function of Stable Diffusion: turning a text prompt into images.

img_center

In the top left-hand corner, you can choose the Stable Diffusion model that you would like to use. As a beginner, you can select the default one for trial.

In the Prompt input box, you need to enter detailed description for the image you want to generate. If you don't want something in your image, enter the corresponding text in the Negative Prompt input box.

img_center

Continue looking down and you will see more settings. Let’s focus on some important parameters.

Sampling method

It means what algorithm you use to generate the image. The most common used ones are Euler a, DPM++2M Karras, and DPM++SDE Karras.

Sampling steps

It means how many times will the image be refined before you see it. Use at least 20 steps. Increase if you see a blurry image, but preferably no more than 50.

Width / Height

The standard size of the image is 512×512 pixels. If you want a higher resolution image, then change the values of the Width and the Height.

Batch count / Batch size

Batch count means how many images you want to get as part of the output. Batch size means how many images are worked on at the same time. Feel free to change the values if you want to generate multiple images at once.

CFG Scale

This defines how closely Stable Diffusion should match the prompt that you enter in above. Typical value is 7. Increase if you want the image to follow the prompt more, but preferably no more than 12.

Seed

Seed is essentially the randomly generated number which serves as a basis for the image generation process. It shouldn’t really concern you in the beginning. So just keep the default of -1.

After setting the parameters, you can click the Generate button at the top right to generate the image.

Image-to-image

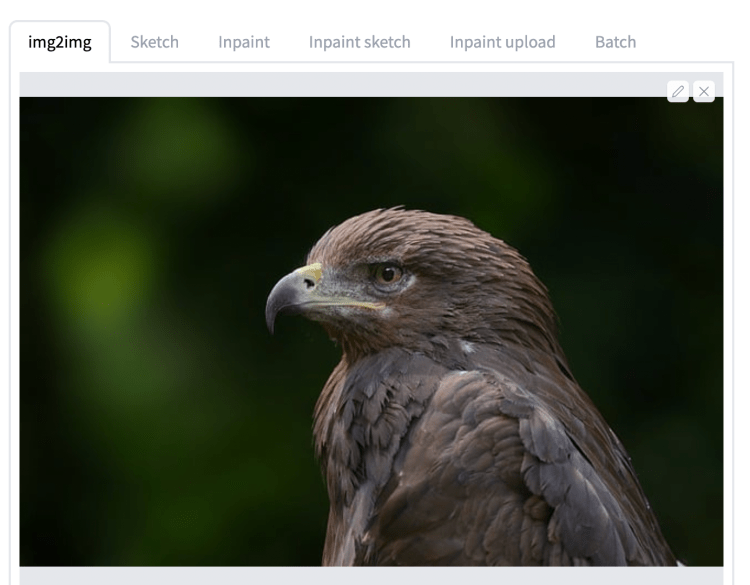
Click the img2img tab to use the image-to-image feature.

You need to drag and drop the base image to the img2img tab on the img2img page, and then adjust the settings.

img_center

Most of the parameters are similar to those of the tex2img. But maybe you need to note this:

Denoising strength

It’s used to control how much the image will change. If set to 0, nothing will change; if set to 1, the new image will not follow the input image. 0.75 is a good starting point that have a good amount of changes.

After setting the parameters, you can click the Generate button at the top right to generate the image.

If you want to add some models for advanced play, here are two helpful posts:


Resource: https://stable-diffusion-art.com/automatic1111/

· 3 min read

This section shows you how to install and run AUTOMATIC1111 on Windows step-by-step.

Please make sure your system meets the following requirements:

  • Windows 10/11.
  • A graphics card with at least 4GB of VRAM.
  • 12GB or more install space. Ideally an SSD.

Step 1: Install python

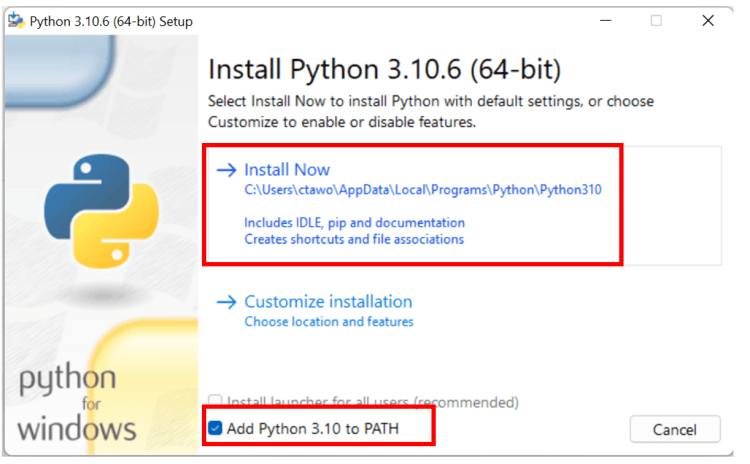
You will need Python 3.10.6 to run Stable Diffusion. Select the 64-bit windows installer, or use this direct download link.
img_center

Make sure “Add Python 3.10 to PATH” is checked. Click “Install Now” to start the installation.

If you encounter an error, it’s most likely because you have previously installed Python. Remove any previously installed Python versions before re-installing 3.10.6. You can do that in Control PanelAdd or remove programs.

If you encounter an error of not finding Python in later steps, try installing Python 3.10 on Microsoft Store.

Step 2: Install git

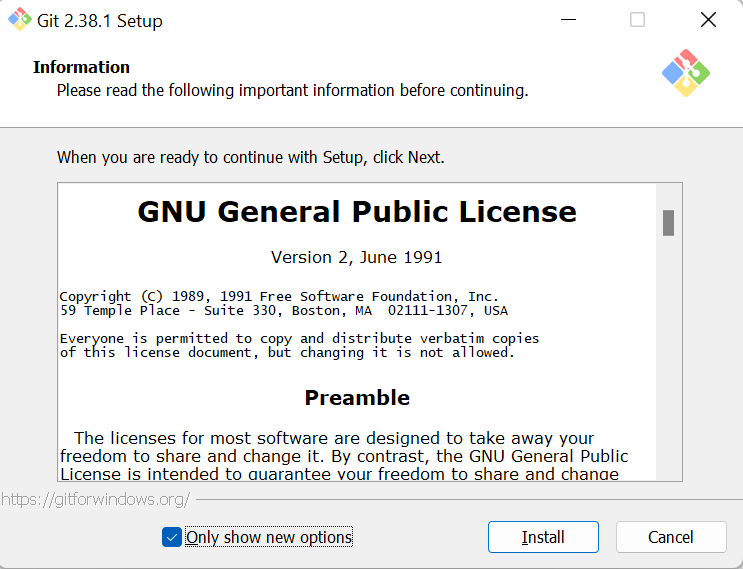
Download git from the git website and run the launcher.
img_center

Step 3: Clone web-ui

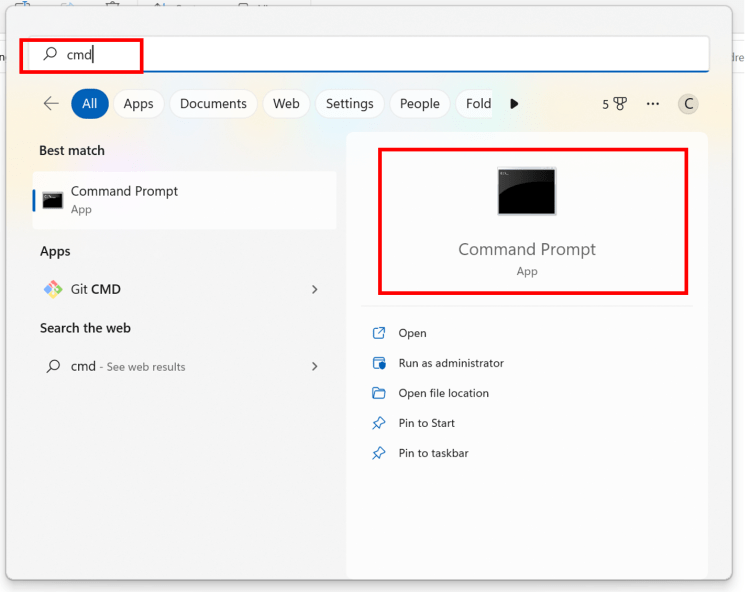
Press the Window key (Should be on the left of the space bar on your keyboard), a search window should pop up. Type cmd.
img_center

Click on Command Prompt. The command prompt window would show up.

First, make sure you are in your home folder by typing the following command and then pressing Enter. (Tip: You should be able to use right-click to paste in Command Prompt.)

cd %userprofile%

You should see your prompt shows something like C:\Users\YOUR_USER_NAME>.

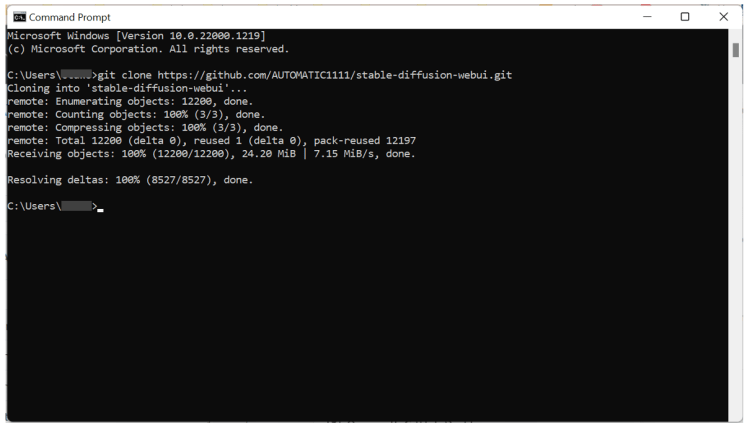
Next type the following command and press Enter to clone the AUTOMATIC1111 repository.

git clone https://github.com/AUTOMATIC1111/stable-diffusion-webui.git
img_center

A folder called stable-diffusion-webui should be created in your home directory.

It’s ok to clone the repository in a different folder instead of %userprofile%, as long as you can find the newly created stable-diffusion-webui folder. You will need to change the folder location accordingly in the following steps.

Step 4: Download a model file

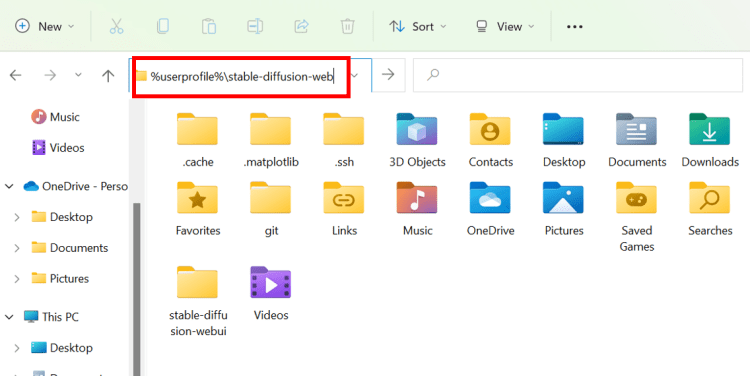
Next, go to the newly created folder in File Explorer. Put in

%userprofile%\stable-diffusion-webui

in the address bar and press enter.
img_center

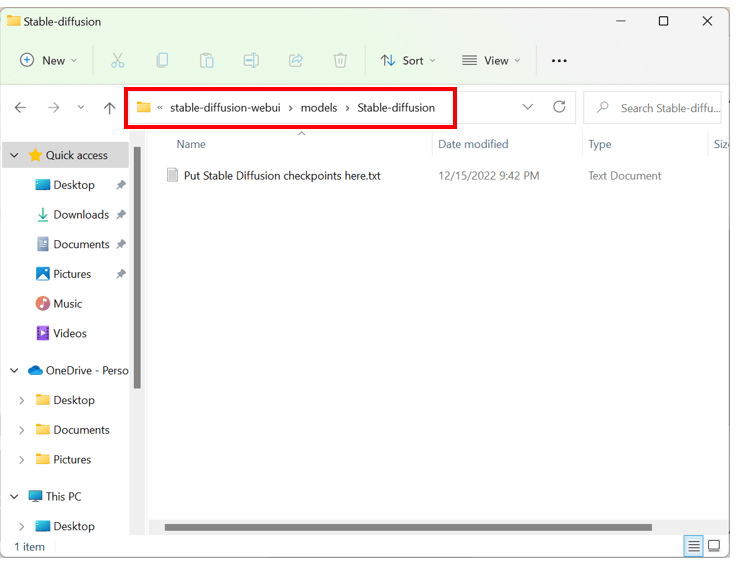
Navigate to the folder models and then Stable-diffusion. You should see a file Put Stable Diffusion checkpoints here.txt like below.
img_center

Download the Stable Diffusion v1.5 model checkpoint file (download link). Put it in that folder.

Step 5: Run webui

Now in File Explorer, go back to the stable-diffusion-webui folder. That is, go back up two levels or type

%userprofile%\stable-diffusion-webui

again in the address bar.

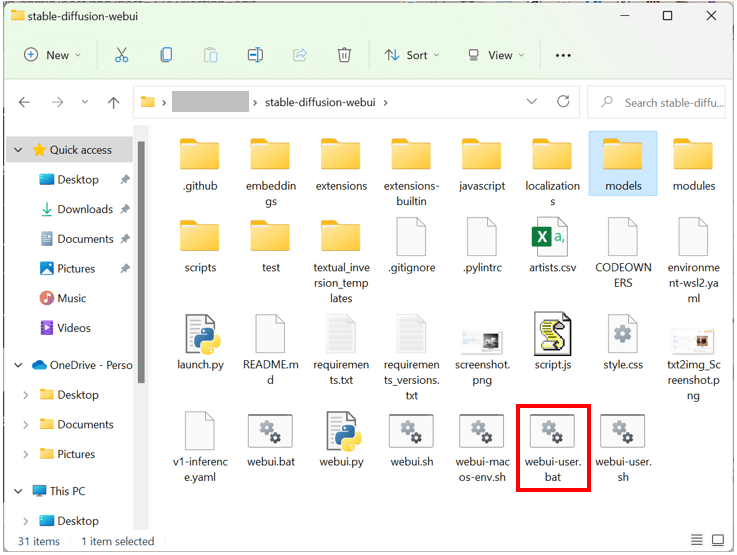
Find a file called webui-user.bat. Double-click to run and complete the installation.
img_center

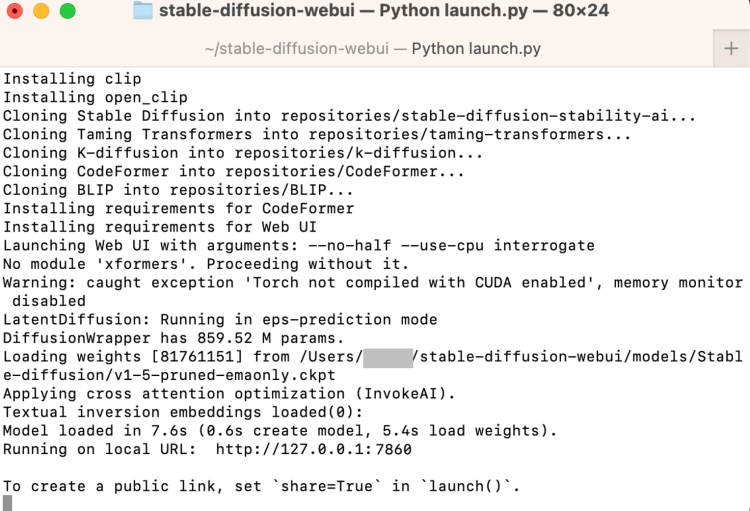
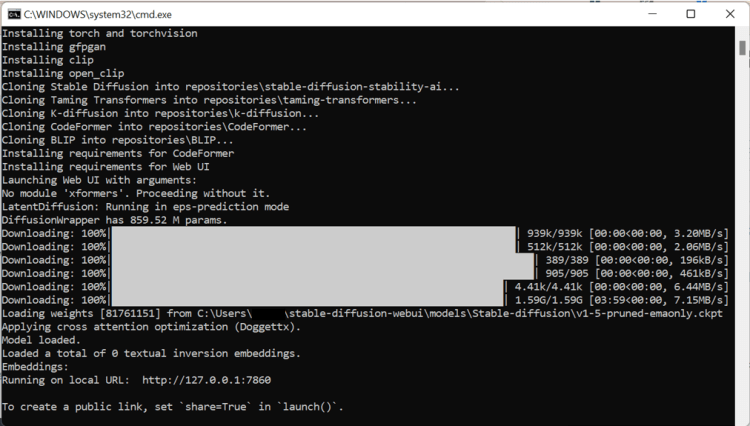
This last step is going to take a while. When it is done, you will see a message

Running on local URL: http://127.0.0.1:7860

like below.
img_center

In your web browser, go to the URL

http://127.0.0.1:7860/

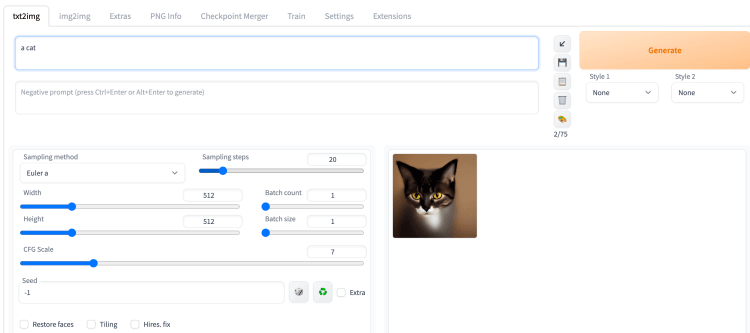
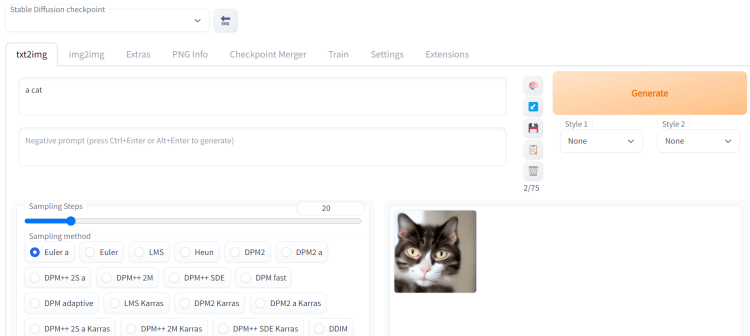
You should see the AUTOMATIC1111 webui! Put in a prompt (e.g. “a cat”) and hit Generate to test if Stable Diffusion is running correctly.
img_center

When you are done using Stable Diffusion, close the cmd black window to shut down Stable Diffusion.

To rerun Stable Diffusion, you just need to double-click the webui-user.bat.

Here is a how-to-use guide for beginners: How to use Stable Diffusion


Resource: https://stable-diffusion-art.com/install-windows/
· 2 min read

This section shows you how to install and run AUTOMATIC1111 on Mac step-by-step.

Please make sure your system meets the following requirements:

  • Mac OS 12.5.1 or above.
  • Apple Silicon Mac model.
  • 16 GB or minimum 8 GB of RAM.
  • Mac with M1 or M2 chip (recommended), or Intel-based Mac (performance may be slower).

img_center

Step 1: Install Homebrew

Install Homebrew, a package manager for Mac, if you haven’t already. Open the Terminal app, type the following command, and press return.

/bin/bash -c "$(curl -fsSL https://raw.githubusercontent.com/Homebrew/install/HEAD/install.sh)"

Step 2: Install a few required packages

Install a few required packages. Open a new terminal and run the following command

brew install cmake protobuf rust python@3.10 git wget

Step 3: Clone the webui repository

Clone the AUTOMATIC1111 repository by running the following command in the terminal

git clone https://github.com/AUTOMATIC1111/stable-diffusion-webui

A new folder stable-diffusion-webui should be created under your home directory.

Step 4: download model

You will need a model to run Stable Diffusion. Use the following link to download the v1.5 model.

Download link

Put the file in the folder stable-diffusion-webui/models/Stable-diffusion. You can get there in the Finder app. In the top menu, click Go and then Home. Double Click to go to the folder stable-diffusion-webui, and then models, and then Stable-diffusion.

When you are done with this step, the Stable-diffusion folder should have two files like below.

img_center

Step 5: Run Webui

Follow the steps in this section to start AUTOMATIC1111 GUI for Stable Diffusion.

In the terminal, run the following command.

cd ~/stable-diffusion-webui;./webui.sh 

It will take a while when you run it for the very first time.

img_center

Open a web browser and click the following URL to start Stable Diffusion.

http://127.0.0.1:7860/

You should see the AUTOMATIC1111 GUI. Put in a prompt “a cat” and press Generate to test using the GUI.

img_center

Close the terminal when you are done. Follow the steps in this section the next time when you want to run Stable Diffusion.

Here is a how-to-use guide for beginners: How to use Stable Diffusion


Resource: https://stable-diffusion-art.com/install-mac/

· 3 min read

LoRA (Low-Rank Adaptation) is a training technique for fine-tuning Stable Diffusion models.

Stable Diffusion users who like experimenting with models can tell you how quickly their local storage fills up. Because of the large size, It is hard to maintain a collection with a personal computer. LoRA is an excellent solution to the storage problem.

Like textual inversion, you cannot use a LoRA model alone. It must be used with a model checkpoint file. LoRA modifies styles by applying small changes to the accompanying model file.

Where to find LoRA models?

Civitai

img_center

LoRA models on Civitai

Civitai hosts a large collection of LoRA models. Apply the LORA filter to see only LoRA models. You may find that they all tend to be similar: female portraits, anime, realistic illustration styles, etc.

Be aware that there’s a lot of NSFW stuff on Civitai. Make sure to put on NSFW filter if you don’t want to see something you cannot unsee…

Hugging Face

img_center

LoRA models on Hugging Face

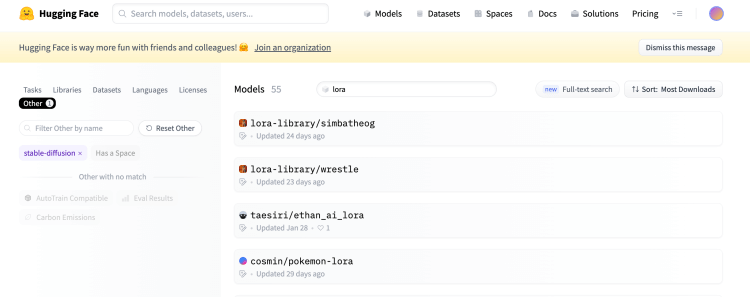
Hugging Face is another source of LoRA libraries. You will find more varieties of LoRA models. But there are not as many LoRA models there. Their collection is a lot smaller.

Search LoRA models in Hugging Face

LoRA Library in Hugging Face

How to use LoRA?

In this section, you will find instructions to use LoRA model in AUTOMATIC1111 Stable Diffusion GUI. AUTOMATIC1111 supports LoRA natively. You don’t need to install any extensions.

Step 1: Install LoRA model

To install LoRA models in AUTOMATIC1111 webui, put the model files in the following folder.

stable-diffusion-webui/models/Lora

Step 2: Use LoRA model

To use a LoRA model, put the following phrase in the prompt.

<lora:filename:multiplier>

filename is the file name of the LoRA model, excluding the extension (.pt, .bin, etc).

**multiplier** is the weight applied to the LoRA model. The default is 1. Setting it to 0 disables the model.

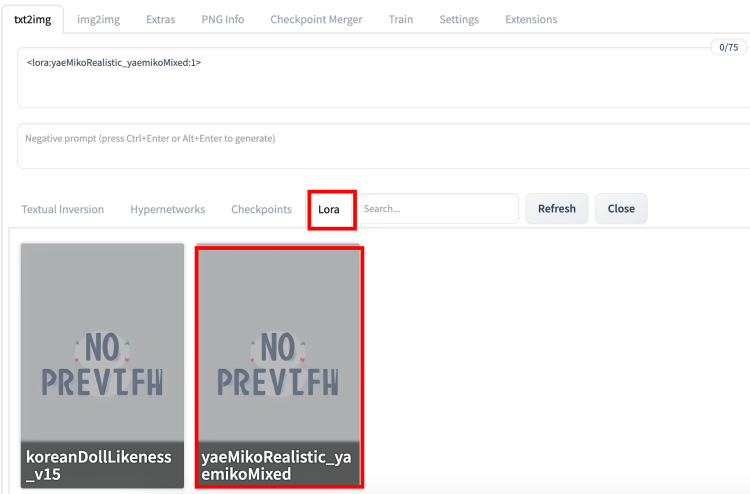
How can you be sure the filename is correct? Instead of writing this phrase, you should click on the model button.

img_center

Click on the Lora tab. You should see a list of LoRA models installed. Click on the one you want to use.

The LoRA phrase will be inserted in the prompt.

img_center

Notes on using LoRA

You may adjust the multiplier to crank up or tune down the effect. Setting the multiplier 0 disables the LoRA model. You can adjust the style effect between 0 and 1.


Resource: https://stable-diffusion-art.com/lora/

· 3 min read

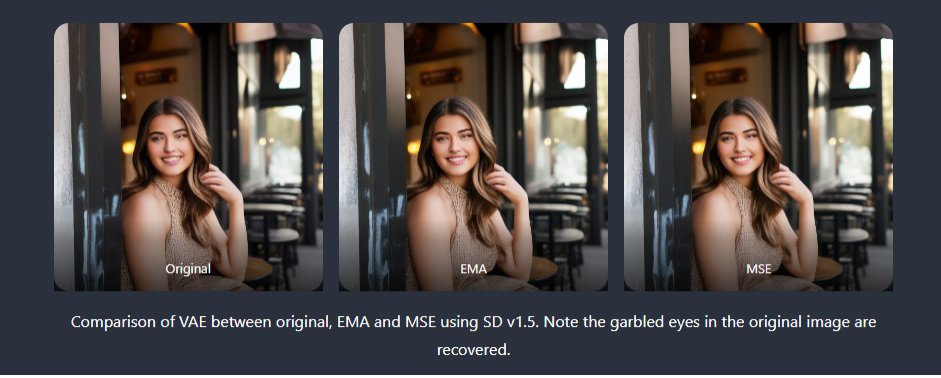
VAE is a partial update to Stable Diffusion 1.4 or 1.5 models that will make rendering eyes better. I will explain what VAE is, what you can expect, where you can get it, and how to install and use it.

VAE stands for variational autoencoder. It is part of the neural network model that encodes and decodes the images to and from the smaller latent space, so that computation can be faster.

Do I need a VAE

You don’t need to install a VAE file to run Stable Diffusion—any models you use, whether v1, v2 or custom, already have a default VAE.

When people say downloading and using a VAE, they refer to using an improved version of it. This happens when the model trainer further fine-tunes the VAE part of the model with additional data. Instead of releasing a whole new model, which is a big file, they release only the tiny part that has been updated.

img_center

You don’t need to use a VAE if you are happy with the result you are getting. E.g., you are already using face restoration like CodeFormer to fix eyes.

You should use a VAE if you are in the camp of taking all the little improvements you can get. You only need to go through the trouble of setting it up once. After that, the art creation workflow stays the same.

How to use VAE

Download

Currently, there are two improved versions of VAE released by Stability. Below are direct download links.

Download link for EMA VAE

Download link for MSE VAE

Install

This install instruction applies to AUTOMATIC1111 GUI. Place the downloaded VAE files in the directory

stable-diffusion-webui/models/VAE

For Linux and Mac OS

For your convenience, run the commands below in Linux or Mac OS under stable-diffusion-webui’s directory downloads and installs the VAE files.

wget https://huggingface.co/stabilityai/sd-vae-ft-ema-original/resolve/main/vae-ft-ema-560000-ema-pruned.ckpt -O models/VAE/vae-ft-ema-560000-ema-pruned.ckpt wget https://huggingface.co/stabilityai/sd-vae-ft-mse-original/resolve/main/vae-ft-mse-840000-ema-pruned.ckpt -O models/VAE/vae-ft-mse-840000-ema-pruned.ckpt 

Use

To use a VAE in AUTOMATIC1111 GUI, go to the Settings tab and click the Stabe Diffusion section on the left.

And find a section called SD VAE. In the dropdown menu, select the VAE file you want to use.

img_center

Press the big red Apply Settings button on top. You should see the message

Settings: sd_vae applied

in the Setting tab when the loading is successful.

Other options in the dropdown menu are:

  • None: Use the original VAE that comes with the model.
  • Auto: see this post for behavior. I don’t recommend beginners use Auto since it is easy to confuse which VAE is used.

Pro tip: If you cannot find a setting, click Show All Pages on the left. All settings will be shown on a single page. Use Ctrl-F to find the setting.


Resource: https://stable-diffusion-art.com/how-to-use-vae/